FAQ
Frequently Asked Questions
- Getting Started with BLiNK
- How do I connect using BLiNK
-
To use your BLINK service, you will need to use an active BLiNK SIM card and an internet device (modem, tablet, or phone).
General BLiNK Settings:
Profile Name: BLiNK
APN: CONNECT
Authentication: CHAP
Dial Number: *99# SP Code: 888a1 - Configuring your IOS Device
-
1. Insert BLiNK SIM in your device
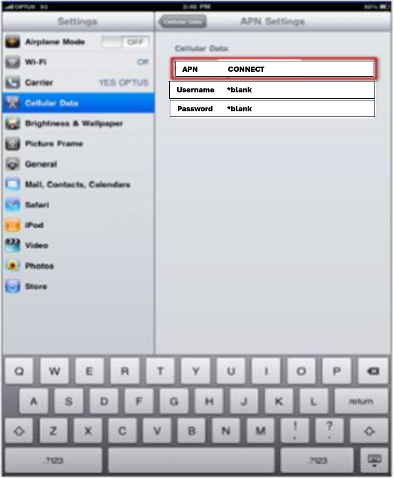
2. Once switched on, go to Settings
3. Make sure that Airplane Mode, WiFi and Bluetooth are OF
4. Tap Cellular Data, make sure it's ON
5. Tap APN Settings
6. Change APN to CONNECT
7. Press Home button and go back to home page.
-
- Configuring your Android Device
-
From the home screen, tap the Menu button.
-
1. Tap Settings
2. Tap Mobile networks
3. Tap Access Point Names
4. Tap the Menu button
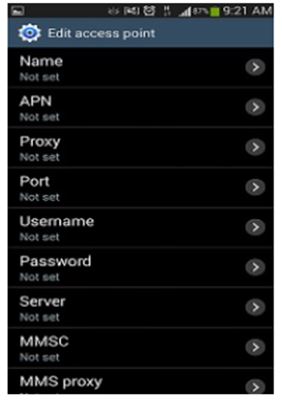
5. Tap New APN
6. Tap the Name field
7. Enter BLiNK, then tap OK
8. Tap the APN field
9. Enter CONNECT, then tap OK
10. Leave the Username field blank
11. Leave the Password field blank
12. Scroll down and type Authentication Type field
13. Choose CHAP
14. Tap the Menu icon
15. Tap Save
-
- MODEMS
- Pocket Wifi Devices
- Huawei
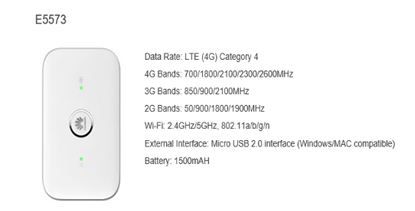
- E5573
-
-
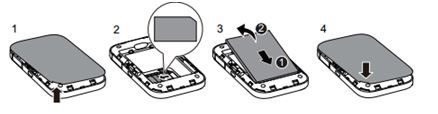
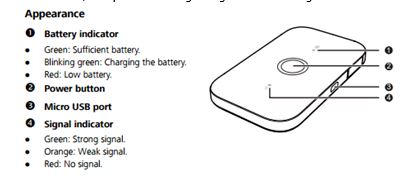
1. Install the battery and BLiNK SIM card into the modem
-
2. Switch the modem ON, the power and signal lights should be green.
- For laptop users (Windows 10)
-
a. Go to your computer’s Network and Internet settings
b. Click Broadband Connection and then WiFi
c. Select the SSID of the Huawei modem on the network list (you may also see the SSID at the back of the modem for your reference)
d. Type in the WiFi Key/Network Key/Password (the WiFi key may be seen at the back of the modem or inside the battery panel)
e. Press CONNECT
-
- For MAC users (OS Sierra)
-
a. Click the WiFi logo at the top of the home screen
b. Click Join Network
c. Type in the SSID/Network name (you may also see the SSID at the back of the modem for your reference)
d. Type in the WiFi Key/Network Key/Password (the WiFi key may be seen at the back of the modem or inside the battery panel)
e. Press Join
-
- For iPad users
-
a. Tap Settings
b. Tap WiFi and turn WiFi ON
c. Select the modem’s SSID on the list, type in the WiFi Key/Password and tap Connect
d. Status should show as Connected
-
- For Android users
-
a. Tap Settings
b. Switch WiFi ON
c. Tap Add WiFi Network
d. Type in the SSID and Network Security Key (you may see both details at the back of the modem or in the battery panel)
e. Press Connect
f. Status should show as Connected
-
-
3. Open up a browser (Internet Explorer, Google Chrome, Firefox, Safari etc) and enter http://192.168.8.1
4. Enter the username and password to log into the web management page. Please refer to your modem’s quick start guide/manual for the username and password.
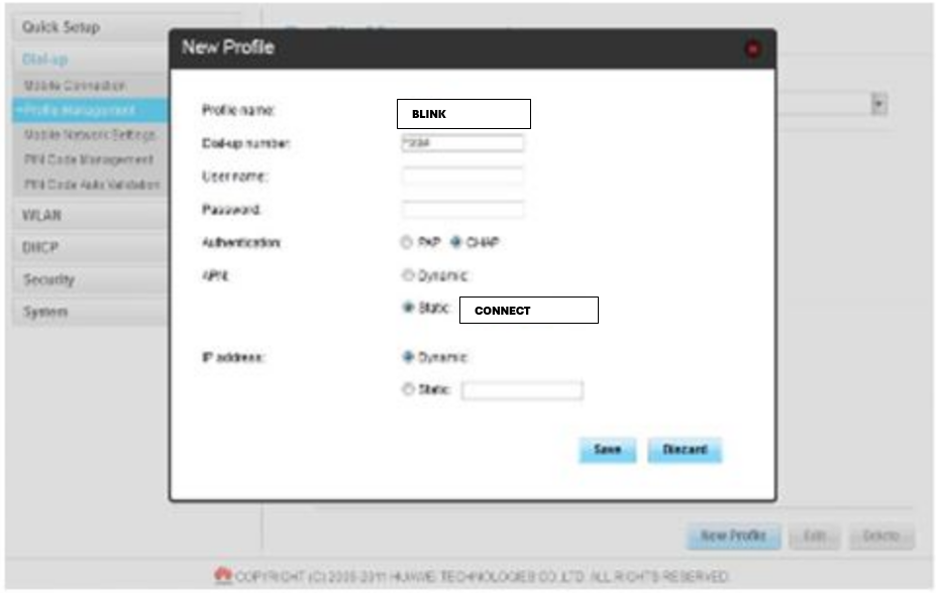
5. Click Settings and click Dial Up then select Profile Management
6. Change the APN Adapter to Manual and press Save
7. Select the New button
8. Set Profile Name to BLiNK, Authentication to CHAP, APN to static with CONNECT in the box the click Save
9. Select Mobile Connection, select BLiNK in the profile list and change the Connection Mode to Auto and press Apply
-
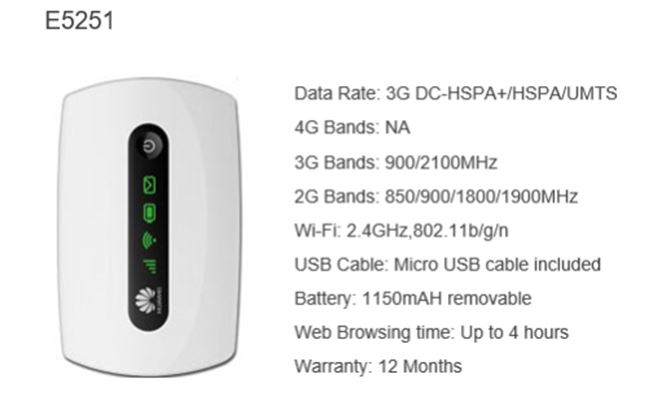
- E5251
-
-
1. Install the battery and BLiNK SIM card into the modem

-
2. Switch the modem ON, the power and signal lights should be green.
- For laptop users (Windows 10)
-
a. Go to your computer’s Network and Internet settings
b. Click Broadband Connection and then WiFi
c. Select the SSID of the Huawei modem on the network list (you may also see the SSID at the back of the modem for your reference)
d. Type in the WiFi Key/Network Key/Password (the WiFi key may be seen at the back of the modem or inside the battery panel)
e. Press CONNECT
-
- For MAC users (OS Sierra)
-
a. Click the WiFi logo at the top of the home screen
b. Click Join Network
c. Type in the SSID/Network name (you may also see the SSID at the back of the modem for your reference)
d. Type in the Type in the WiFi Key/Network Key/Password (the WiFi key may be seen at the back of the modem or inside the battery panel)
e. Press Join
-
- For iPad users
-
a. Tap Settings
b. Tap WiFi and turn WiFi ON
c. Select the modem’s SSID on the list, type in the WiFi Key/Password and tap Connect
d. Status should show as Connected
-
- For Android users
-
a. Tap Settings
b. Switch WiFi ON
c. Tap Add WiFi Network
d. Type in the SSID and Network Security Key (you may see both details at the back of the modem or in the battery panel)
e. Press Connect
f. Status should show as Connected
-
-
3. Open up a browser (Internet Explorer, Google Chrome, Firefox, Safari etc) and enter http://192.168.1.1
4. Enter the username and password to log into the web management page. Please refer to your modem’s quick start guide/manual for the username and password.
5. Click Settings and click Dial Up then select Profile Management
6. Change the APN Adapter to manual and press Save
7. Set Profile Name to BLiNK, Authentication to CHAP, APN to static with CONNECT in the box the click Save
8. Select Mobile Connection, select BLiNK in the profile list and change the Connection Mode to Auto and press Apply

-
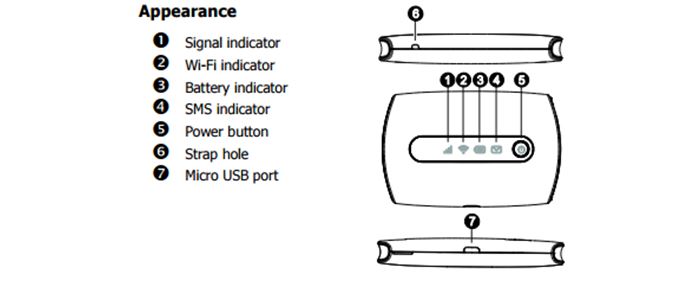
- E5573
- Alcatel
-
-
1. Install the battery and the BLiNK SIM card into the modem

-
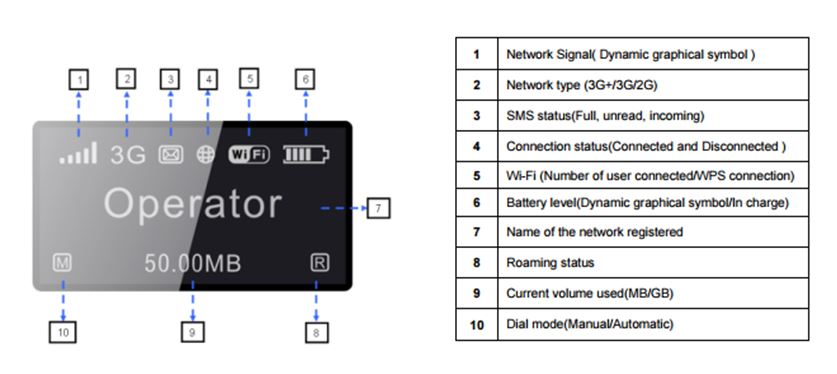
2. Switch the modem ON, and check the modem screen - it should show the following icons.
- For laptop users (Windows 10)
-
a. Go to your computer’s Network and Internet settings
b. Click Broadband Connection and then WiFi
c. Select the SSID of the Alcatel One Touch modem on the network list (you may also see the SSID at the back of the modem for your reference)
d. Type in the WiFi Key/Network Key/Password (the WiFi key may be seen at the back of the modem or inside the battery panel). You may also use the last 8 digits of the IMEI number as your default WiFi Key.
e. Press CONNECT
-
- For MAC users (OS Sierra)
-
a. Click the WiFi logo at the top of the home screen
b. Click Join Network
c. Type in the SSID/Network name (you may also see the SSID at the back of the modem for your reference)
d. Type in the WiFi Key/Network Key/Password (the WiFi key may be seen at the back of the modem or inside the battery panel). You may also use the last 8 digits of the IMEI number as your default WiFi Key.
e. Press Join
-
- For iPad users
-
a. Tap Settings
b. Tap WiFi and turn WiFi ON
c. Select the modem’s SSID on the list, type in the WiFi Key/Password and tap Connect
d. Status should show as Connected
-
- For Android users
-
a. Tap Settings
b. Switch WiFi ON
c. Tap Add WiFi Network
d. Type in the SSID and Network Security Key (you may see both details at the back of the modem or in the battery panel)
e. Press Connect
f. Status should show as Connected
-
-
3. Open up a browser (Internet Explorer, Google Chrome, Firefox, Safari, etc) and enter http://192.168.1.1
4. Enter the password to log into the web management page. Please refer to your quick start guide/manual for the password details.
5. Hover mouse on Connection tab, click Connection Mode
6. Switch mode to Manual then Save
7. Go back to Connection, check the Connection Status, make sure it is disconnected
8. Go back to Connection click Connection Profile
9. Click New, input the following, leave username and password blank:
Profile Name: BLiNK
APN: CONNECT
Number: *99#
10. Click Save
11. Go back to Connection Mode and switch it back to Auto then Save
12. Check the Connection Status, it should show as Connected
-
- Huawei
- USB Modems
- L100
-
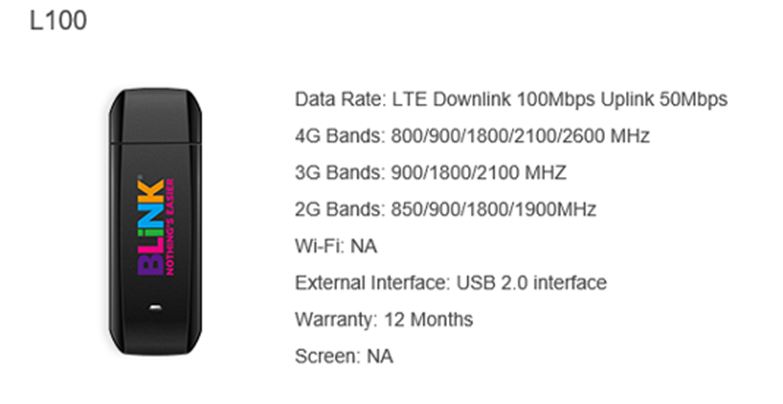
1. Plug in the USB device on any of the ports (Laptop)
2. Launch the BLiNK application from the desktop
3. On the dashboard, click Settings then click Connection Profile
4. Click Add
5. Enter BLiNK details:
Profile Name: BLiNK
APN: CONNECT
Authentication Protocol: CHAP
User name and password: leave blank
6. Click Apply and OK
7. Click on the new profile created and click Set Default
-
- L100
- Pocket Wifi Devices
-
- Which network does BLiNK use?
-
BLiNK runs on the powerful Optus Network.
-
- Is my SIM 4G capable?
-
Yes. As long as you have 4G capability in your area and your device is 4G capable, you would be able to connect to the 4G network. You may check the available coverage through the BLiNK Mobile Coverage Map on our website (https://www.blinkit.net.au/blink-coverage)
-
- How do I connect using BLiNK
- Using your BLiNK service
- Does my service automatically renew?
-
Yes. You are billed on a monthly basis and your data is allocated on the 1st of every month.
-
- What happens when I reach my monthly allocated data allowance?
-
You will get the option to purchase additional data or you may wait until the 1st of the month for your data to renew
-
- Does my unused data get rolled over into the next month?
-
No. Unused data is not rolled over into the following month.
-
- Does my service automatically renew?
- Managing your BLiNK Account
- Can I change my plan?
-
Yes. You may request to change your plan within the current month, however the new plan will only become effective on the 1st of the following month. To know more please call BLiNK at 1800 254 654.
-
- How do I purchase additional data?
-
We have several options to purchase additional data. Once you have reached your data limit you will be redirected to a portal where you have the option to purchase more. Alternatively, you may call BLiNK on 1800 254 654 and a representative can arrange for a top up.
-
- How much does a data block cost?
-
A data block costs $10 and provides an additional 1GB.
-
- How do I update my account details?
-
You may update your account information by logging into your Dashboard https://myaccountphones.blinkit.net.au/blinkprod/ and going to Personal Details. You can update the following information:
a. Billing Address
b. Phone Number
c. Email Address
d. Account Password
-
- Can I reset my password online?
-
Yes. On the login page, click on the ‘Forgot Your Password’ link and you will be asked to key in your email address. Password reset instructions will be sent to your email. Alternatively, you may log into your Dashboard and click Personal Details and click Change Password.
-
- What can an authorized contact do?
-
Authorized contacts can access your account information in your absence. The main account holder, however, has the sole authority when processing payments, plan changes, top up requests and cancellation. To add an authorized person, please call BLiNK at 1800 254 654.
-
- Can I change my plan?
- Basic Troubleshooting Guides
- No USIM Detected
-
The USIM card is not being detected by the modem
Could be that the USIM or the modem is faulty
1. Ensure that the USIM is inside the device
2. If there's a USIM, remove the USIM, lightly wipe the gold plate and put the USIM back, ensure that the USIM is inserted correctly (check as to how the diagram is drawn)
3. If issue persists, try the SIM on a different device if available/applicable or contact BLINK Support at 1800 254 654
-
- No Device Issue (USB Modems)
-
Computer/laptop cannot read/recognize the device inserted
1. Ensure that the device is securely plugged in the USB port
2. Try to plug the device on any of the available ports
3. Wait for the drivers to install before launching the BLiNK Management Tool
4. If issue persists, uninstall and reinstall the device software
5. If issue persists, contact BLiNK Support at 1800 254 654
-
- Connection Terminated
-
Device is connected to the modem but no internet connectivity
Possible reasons: Incorrect APN, SIM Card Issue, Coverage Issue
-
- USB Modem
-
1. Unplug the USB modem then check the USIM card
2. Make sure that the USIM card is inserted properly then plug in back in the USB port
3. Create a new connection profile:
4. Plug in the USB device on any of the ports (Laptop)
5. Launch the BLiNK application from the desktop
6. On the dashboard, click Settings then click Connection Profile
7. Click
8. Enter BLiNK details:
Profile Name: BLiNK
APN: CONNECT
Authentication Protocol: CHAP
User name and password: leave blank
9. Click Apply and OK. Click on the new profile created and click Set Default
10. Test the connection, if unsuccessful, try a different USB port
11. Call BLiNK Support at 1800 254 654 if issue persists
-
- Pocket Wifi Devices
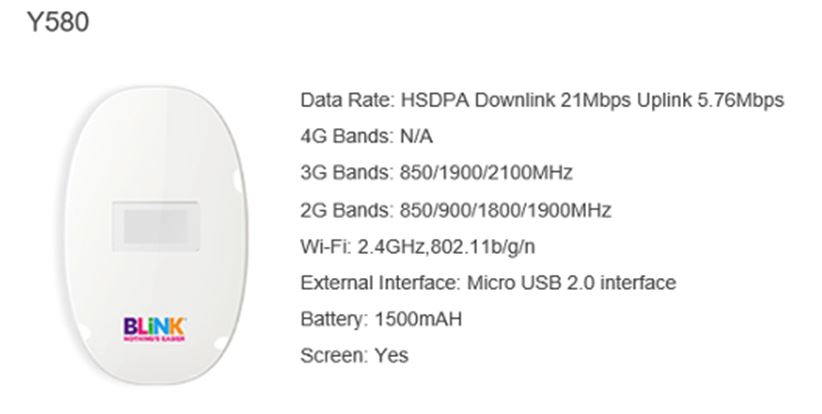
- Y580
-
1. Connect the modem to a WiFi compatible device (laptop, tablet, smart phone)
2. Open up a browser (Internet Explorer, Google Chrome, Firefox, etc) and enter http://192.168.1.1
3. Enter the password to log into the web management page
4. Hover mouse on Connection tab, click Connection Mode
5. Switch mode to Manual then Save
6. Go back to Connection, check the Connection Status, make sure it is disconnected
7. Go back to Connection click Connection Profile
8. Click New, input the following, leave username and password blank:
Profile Name: BLiNK
APN: CONNECT
Number: *99#
9. Click Save
10. Go back to Connection Mode and switch it back to Auto then Save
11. Check the Connection Status, it should show as Connected
-
- HUAWEI
-
1. Connect the modem to a WiFi compatible device (laptop, tablet, smart phone)
2. Open up a browser (Internet Explorer, Google Chrome, Firefox, etc) and enter http://192.168.1.1 or http://192.168.8.1
3. Enter the username and password to log into the web management page
Username: admin
4. Click Settings and click Dial Up then select Profile Management
5. Change APN Adapter to manual and press Save
6. Select the New button
7. Set Profile Name to BLiNK, Authentication to CHAP, APN to static with CONNECT the box the click Save
8. Select Mobile Connection, select BLiNK in the profile list and change the Connection Mode to Auto and press Apply
-
- Y580
- Outgoing Mail Server Settings
- SMTP/Outgoing Mail Server
-
SMTP/Outgoing Mail Server: mail.blink.m2.com.au
-
- SMTP Settings for iPad
-
1. Select Settings > Mail, Contacts, Calendars
2. Tap the email account from which you want to send emails from
3. Tap SMTP under Outgoing Mail Server
4. Tap Add Server..., this window will appear
5. Enter the following information:
Host Name: mail.blink.m2.com.au
User Name: your sending email address
Password: the password you are using
*** After that the iPad will verify your SMTP, then it will return to the details screen.
6. Select the Primary Server and insert the remaining specifics:
Server – ON
Use SSL – Off
Authentication – select Password and key in your password
Server Port – leave it on default
7. Tap Done
-
- SMTP Settings for Android
-
1. Tap the Menu icon and tap Email
2. Select the email account from which you want to send emails from
3. Type in SMTP server – mail.blink.m2.com.au
4. Security Type – None
5. Port – leave at default
6. User name – your email address
7. Password – your password
8. Tap Next and then Done
-
- Outgoing Mail Server Settings for Outlook 2010
-
1. Open Outlook and select File then Account Settings
2. Select the email account and click Change file
3. Type in BLiNK's outgoing mail server (mail.blink.m2.com.au) inside the Outgoing mail server (SMTP) box
4. Then click More Settings
5. Select Outgoing Server and then My outgoing server (SMTP) requires authentication
6. Select Advanced, Outgoing Server SSL should not be selected, click OK
7. Click Next then Finish
-
- SMTP/Outgoing Mail Server
- No USIM Detected
- Online Safety
- How can I keep myself safe online?
-
Ensuring online safety starts with understanding the risks and taking proactive measures to prevent, limit, or block them. It encompasses a wide range of topics, including handling illegal or restricted content, tackling cyberbullying, and addressing other forms of online abuse. If you find yourself at risk in the online realm, don't hesitate to reach out to us or report the incident to the .
-
- What are considered illegal and restricted online content?
-
Illegal and restricted online content encompasses a wide range of materials, from the gravely disturbing, such as images and videos depicting child sexual abuse or acts of terrorism, to content unsuitable for children, like simulated sexual activity, explicit nudity, or intense violence.
Producing, sharing, or downloading these kinds of content are against the law. You may refer to the Online Safety Act or the eSafety Commissioner’s guide to for more info.
-
- I received/saw illegal or harmful content online. What do I do?
-
If you received or saw any illegal and restricted content online, you can either report the incident to us or to the .
When filling out a report, you’ll have to provide evidence about what has happened. This could be noting down information like the web page address (URL) or a person's user profile or supplying screenshots where appropriate. You can visit the for more information.
If possible, we'd encourage you to talk to a family member, close friend, or someone you trust to support you through this process.
-
- How do I collect evidence for online safety threats?
-
If you encounter severe online abuse, refrain from immediately deleting any messages or comments. When reporting the abuse to us, eSafety, or the police, it's crucial to have evidence that indicates the time and location of the content being sent, posted, or shared. Gather this evidence now, as it may vanish if the other person's account is blocked. For more information, please visit eSafety's guidelines on .
-
- How do I keep my Family safe online?
-
As parents or carers, we must be aware of these threats and educate our children about the potential dangers of the internet and how to respond to them.
Aside from awareness, there are other practical steps we can take to keep our family safe online. These include setting boundaries and rules for internet usage, installing parental control software, monitoring online activities, and having open and honest conversations about internet safety with our loved ones. We encourage you to check out the Communications Alliance's to discover products that can help you block illegal and restricted online content.
-
- How can I keep myself safe online?
- Financial Hardship Assistance
- What is Financial Hardship?
-
A situation where a customer is unable to discharge the financial obligations owed due to:
1. unemployment by the customer or a family member
2. illness of the customer or a family member including physical or mental incapacity and/or hospitalization
3. family death
4. reduced income
5. domestic violence
6. natural disaster.
-
- Am I eligible to apply for Financial Hardship assistance?
-
All postpaid BLiNK customers have the right to apply for Financial Hardship assistance. Prepaid customers do not have any financial obligations with BLiNK but our team can still provide you with some options to control your spend.
-
- How can I apply for Financial Hardship assistance?
-
We encourage you to contact us if you experience any difficulties paying for our services. Please contact us by calling our team on 1800 254 654 if you would like to discuss any Financial Hardship matters with us. You can do so from Monday to Friday between 8am to 8pm and Saturday to Sunday between 10am to 6pm.
-
- How long will the assessment take?
-
We will get back to you within 7 business days after you submit the completed application form and other needed supporting documents.
-
- What are the financial hardship assistance options?
-
Depending on the results of the assessment of your financial circumstances, we have a few options that may be applied.
If you wish to stay connected with us, some options include:
1. Spend controls;
2. Restriction of service, in respect of overall or specific services;
3. Transferring you to a Pre-Paid service;
4. Low-cost interim options until you can continue with original payments.
Some other options for suitable financial arrangements include:
1. Temporarily postponing or deferring payments;
2. Agreeing on an alternative arrangement, plan, or contract, including discussing Pre-Paid Services;
3. Waiving late payment fees;
-
- What if my circumstances changed while I’m on a payment arrangement?
-
You need to notify us as soon as your circumstances change so we make the proper adjustments with your current arrangements.
-
- Where can I find a Financial Counsellor?
-
You can talk to a phone financial counsellor or a consumer advocate who deals with financial difficulty matters from anywhere in Australia by ringing 1800 007 007 (minimum opening hours are 9.30 am – 4.30 pm Monday to Friday). This number will automatically switch through to the service in the State or Territory closest to you.
Alternatively, you can find the financial counselling service nearest to you by visiting .
-
- What is Financial Hardship?